
Job Description
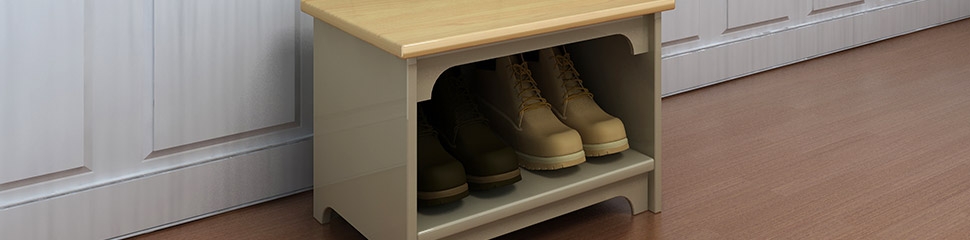
For many of us (especially as we age) it can make a big difference to have a comfortable place to put on and take off our shoes. What’s more, a solid shoe bench provides great storage in any porch or entryway. And the best part? You can actually build your own in just a few easy steps. Below is one method for creating a simple but effective shoe bench… a ‘shoe-in’ if you will! Feel free to make adjustments as you see fit—i.e. adding a backrest or a few decorative cuts—and always review the directions and necessary materials/tools first to avoid surprises.
Materials Required:
- Pine plywood: one-by-twelve, 8′ length
- Pine plywood: two-by-twelve, 3′ length
- 1/2″ thick pine plywood sheet (4′ x 2′ piece)
- Paint or stain
- Wood putty
- Box of trim-head screws (min. 2 1/2″ length)
Tools Needed:
- Tape measure
- Circular or table saw
- Drill (with Phillips bit) or Phillips screwdriver
- Countersink bit
- Pencil
- Paint (or foam) brush
Construction Steps:
- Step 1: From your 1×12 piece, cut two 18″ lengths to serve as the sides of your bench.
- Step 2: Now make your two shelves (bottom and middle) by cutting 20″ lengths.
- Step 3: Cut the top of your bench from your 2×12, making it slightly longer to overhang the sides: a 24″ length will suffice.
- Step 4: From the bottom of your two side pieces, measure and mark a height of 2″ up. (This allows a gap between the floor and your bottom shelf.) Then, using trim-head screws, secure the lower shelf between the two sides.
- Step 5: Repeat this step for the middle shelf at a height mark of 10″ up, again screwing the shelf in place between the two sides. You should now have two sides standing upright with two level shelves between them.
- Step 6: Measure the backside of the unit (allowing the 2″ gap between the lower shelf and the floor). This should come to a measurement of 20″ long x 16″ high. After cutting the piece from your 1/2″ sheet of plywood, attach it to the backside using several trim-head screws.
- Step 7: You can now centre the top of your bench and screw it in place with several more trim-head screws.
- Step 8: After making sure that all of your screws are countersunk, simply fill them with wood putty.
- Step 9: With paint or stain, finish your new shoe bench to a colour of your liking, then fine-tune with any personal touches. You can even secure a cushion to the top for added comfort!
Check your provincial and municipal codes before starting any project. Follow all safety precautions. Information in this document has been furnished by the North American Retail Hardware Association (NRHA) and associated contributors. Every effort has been made to ensure accuracy and safety. Neither NRHA, any contributor nor the retailer can be held responsible for damages or injuries resulting from the use of the information in this document.

